Chapter 9 Git and Github
Seb James taught this class 2020 - 2022 - thanks Seb!
9.1 Motivation
Git is an incredible common tool among software developers and computer scientists. It has powerful functionality for coordinate code projects across many people. As a core data science tool I want everyone on the course to have had some exposure to it, and to recognise the key concepts (as well as the value it has). We will not be using the full functionality in the course.
9.2 Before the class
Create an account on github.com, if you don’t already have one.
- Choose a username you will be happy with forever
- Link to an email you will be able to access after you complete your MSc
Install git on your machine.
- On Windows: https://git-scm.com/download/win
- On Mac: https://git-scm.com/download/mac
Accept all the defaults when queried.
Until you do that you DON’T have the git features enabled in RStudio.
9.3 Accessing git
If you have RStudio you can access git using point and click (top right), or via the terminal (the tab next to Console on the bottom right).
Outside of RStudio:
- Students using Windows can install: https://gitforwindows.org/ Once installed they should be able to open a git bash window and type
git --version - Students on a Mac will have git if they install ‘Xcode’ and ‘Command line tools for Xcode’.They can test by opening a terminal and typing
git --version
9.3.1 Trouble shooting
We are aiming to install git, and manage syncing with github via RStudio. For these three components, different things on different types of computer are required for successful coordination, so there is some irreducible complexity in getting your set up working. The notes below should help for 90% of issues, and hopefully you only need to solve these installation issues once
9.3.1.1 for mac, you may need install homebrew to install git
On mac, change the default terminal to BASH, install homebrew: https://www.howtogeek.com/444596/how-to-change-the-default-shell-to-bash-in-macos-catalina/
In the terminal:
Cmd + space- Type
terminal - Press
enter - In the terminal type,
chsh -s /bin/bash - Enter password (this won’t show as you type) and press enter
- Close the terminal
- Reopen it
- To install git, type
brew install git
Through system preferences:
- Click on
system preferences - Click on
‘Users and groups’ - Press
ctrl + your user - Click
advanced options - Change ‘login shell’ to /bin/bash
- Open the terminal (instructions above)
- To install git, type
brew install git
9.3.1.2 To configure git with RStudio
Once git is installed on your machine, you just need to make sure that RStudio knows that. Once you’ve done this you can control git via RStudio. For longer notes see https://jennybc.github.io/2014-05-12-ubc/ubc-r/session03_git.html
- Click tools
- Click global options
- Click Git/SVN
- If git executable says ‘None’, browse to where git is installed on your laptop
- You need to find the file
git.exewhich is probably in the\binfolder - You may need to click “Show extensions” in the “View” menu to see which is the .exe file
- You need to find the file
- Click ok
Now, in the RStudio terminal:
- Type
git config --global user.name GitHub_USERNAME - Type
git config --global user.email GitHub_EMAIL
Replacing GitHub_USERNAME with your github username and GitHub_EMAIL with the email associated with the account
9.3.1.3 For errors around ‘fatal: authentication failed’
- Click on your profile in the top right
- Select settings
- Scroll to select developer settings on the left hand side
- Click Personal Access Tokens
- Click Tokens (classic)
- Click Generate new token
- select Generate New token (classic)
- Give your token a name (e.g. ‘personal’)
- Change the expiration to ‘No expiration’
- Select repo
- Scroll to generate token and select
- Copy the token (once you leave this page you will lose this token forever)
- Go back to RStudio
- Try to push the commit
- Enter your username
- When prompted to enter password, enter the token you copied NOT your password
- Press ok
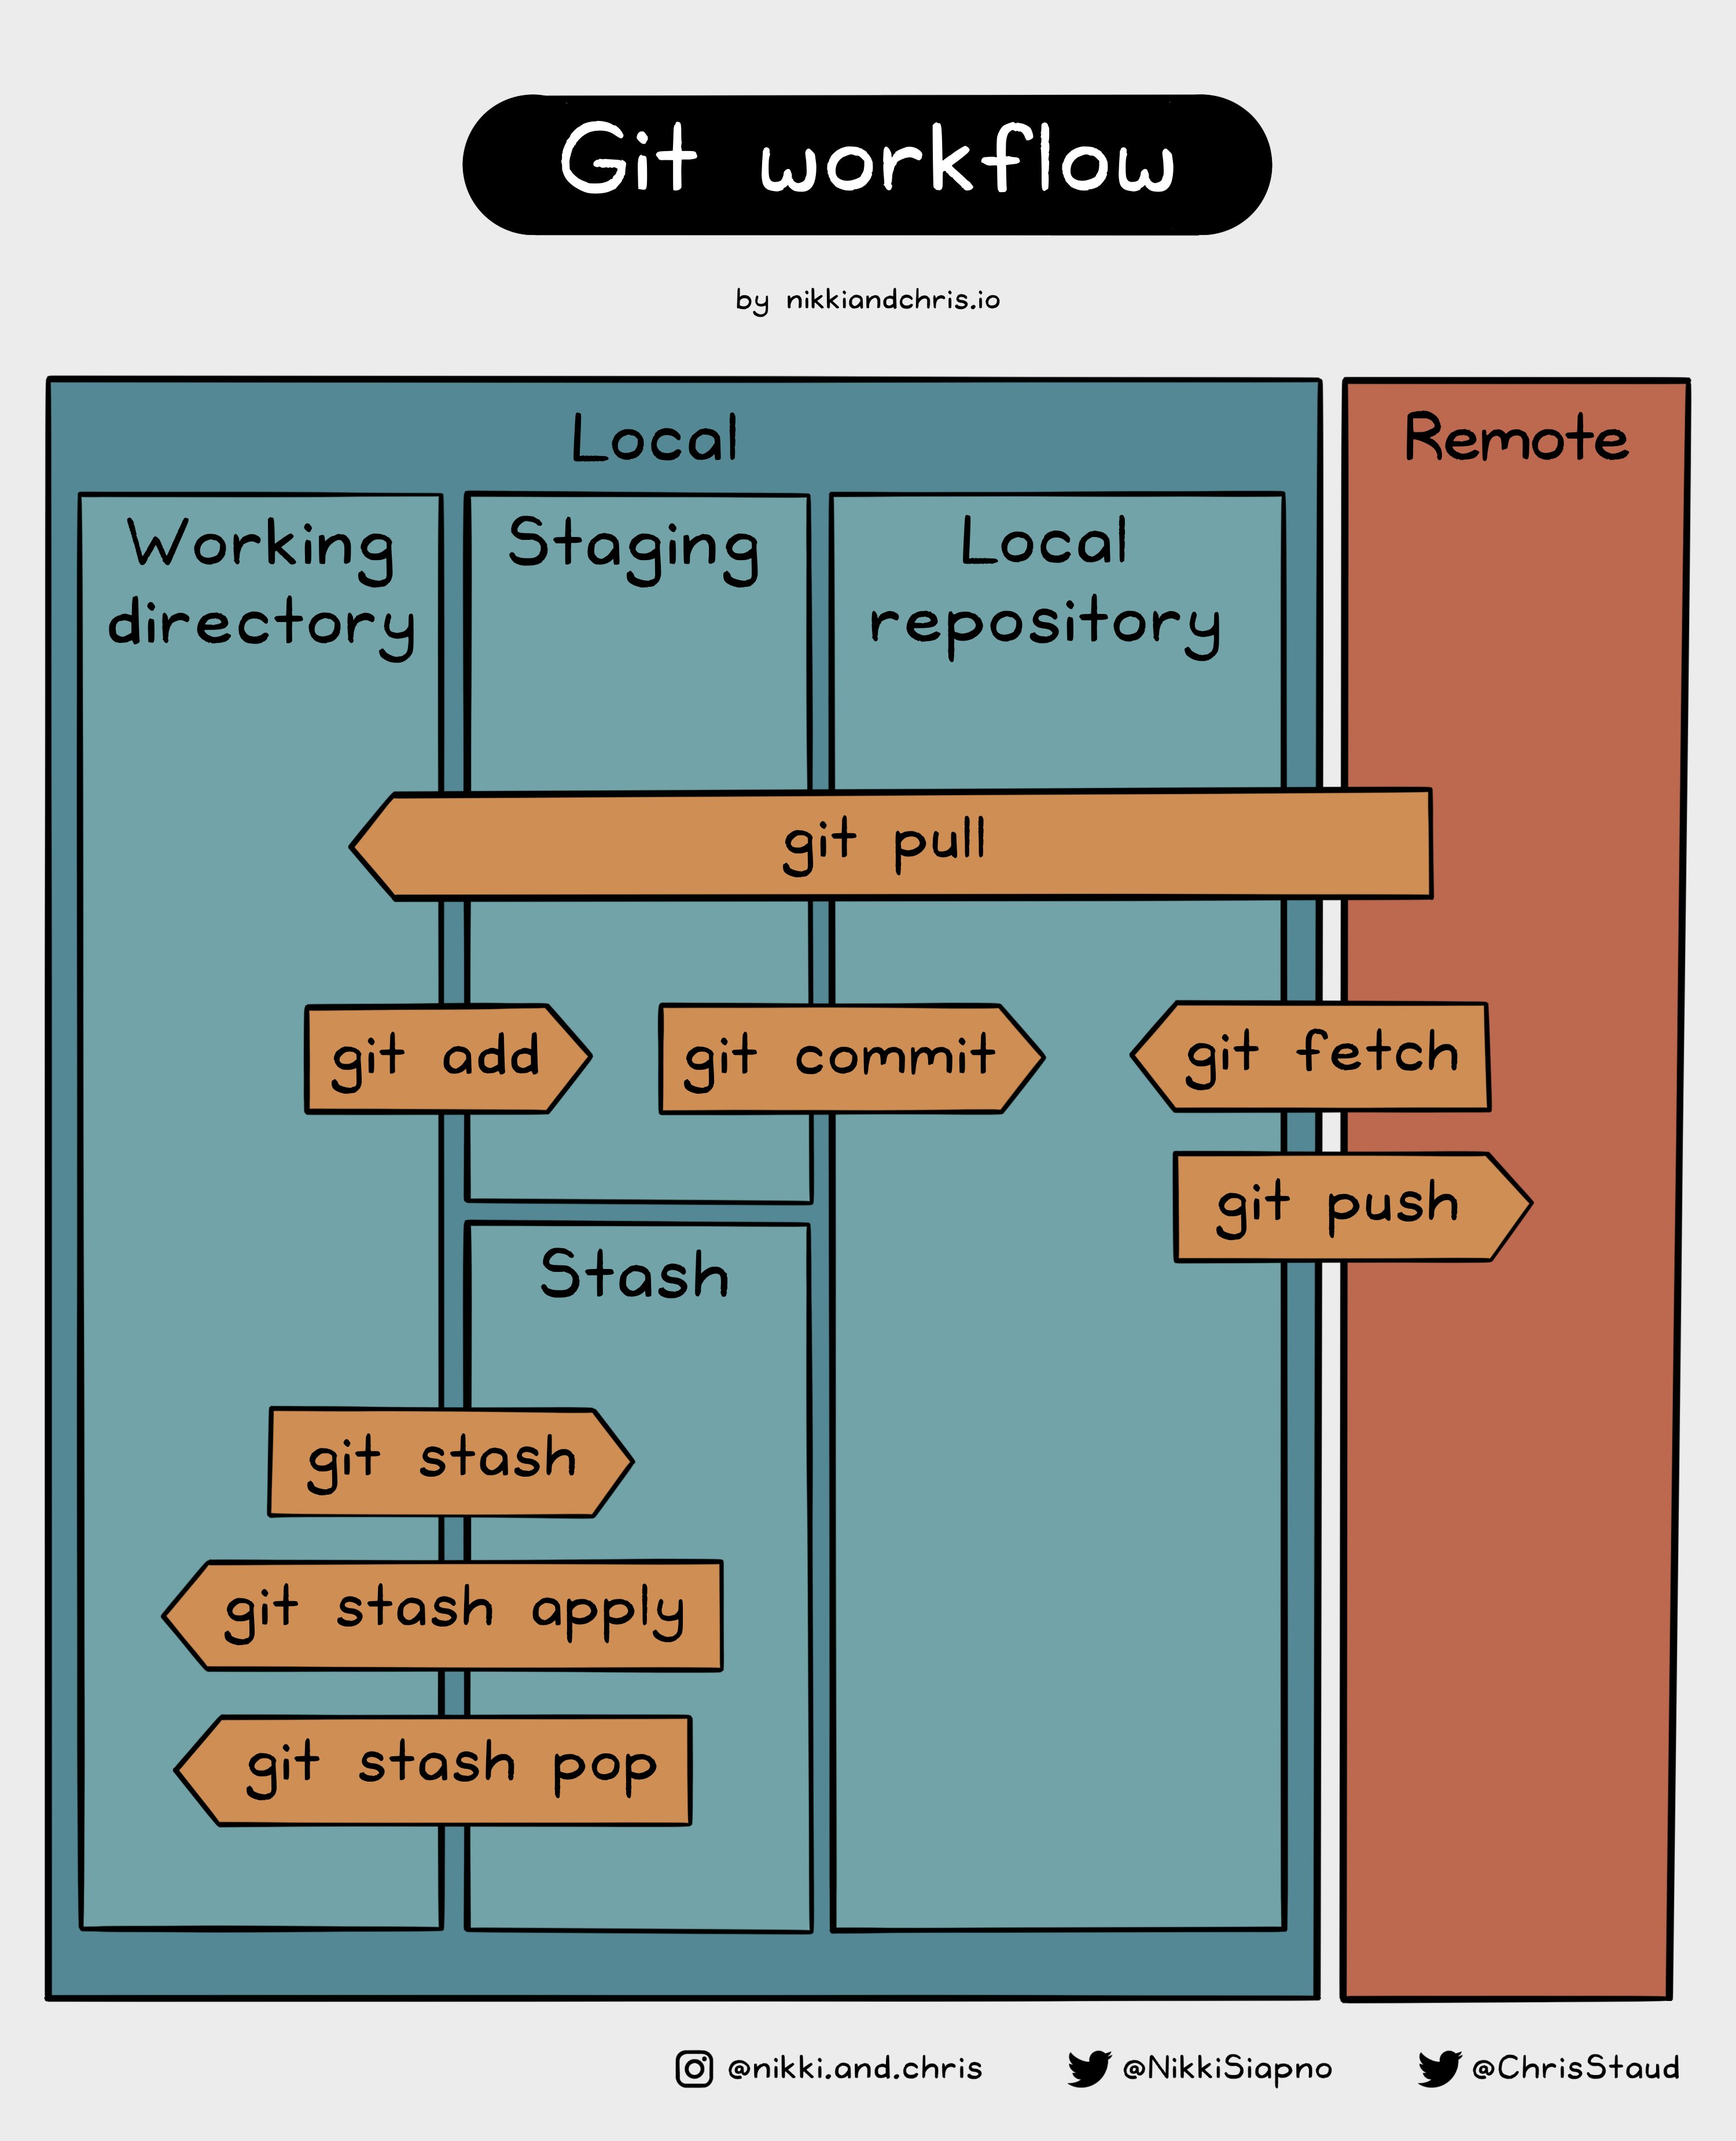
9.4 Essential terminology
repo: “repository”. A set of files which are in the same project and for which version control using git is appliued
remote and local: repositories can be on your computer (local) or online, e.g. on github.com (remote)
clone: make a copy of a repo
branches: repos can exist in different versions, “branches”
Other terminology: stage, commit, push/pull: see below
9.5 Exercises
Github has changed so you can’t use your site password to push changes. You will need to create an access token. See here for help https://docs.github.com/en/get-started/getting-started-with-git/about-remote-repositories#cloning-with-https-urls
- create an account at github.com
- install git on your computer
- configure git with your name and email
- create a repo on github.com
- clone it to your computer, using RStudio Projects
- Once you have cloned a repo a “git” tab will appear in the top right corner of RStudio, allowing you to complete the essential git actions via RStudio & clicking
- make edits and then stage, commit and push within RStudio
- solve any credentialing problems (“fatal authentication error”)
- verify that your local edits appear on the remote repository on github.com
9.6 Checklist
Git and github are fundamental tools which will be relevant for collaborating on reliable computational projects, but it is not essential you master the full range of capabilities they offer for this module.
By the end of this class you should
- have a github account
- installed git on your local machine
- understand why git is useful for code projects
- recognise the essential terminology: repo/repository, branches, remotes and local, clone, stage, commit, push/pull
- create a repo at github.com
- clone a repo to your local machine
- be able to stage, commit and push local changes to a remote repo
9.7 Resources
You can RTFM
- Official documentation: github pages
Or you can try one of the following tutorials, they all teach the same thing but in slightly different ways
- Jenny Bryan git and R Happy Git and GitHub for the useR
- Understanding Git Conceptually
- git/github guide a minimal tutorial
- Vuorre, M., & Curley, J. P. (2018). Curating research assets: A tutorial on the git version control system. Advances in Methods and Practices in Psychological Science, 1(2), 219-236.
- Software carpentry: Version Control with Git
- Seb James Git Tutorial repo, PDF of slides